Hello Hello!
I'm so sorry for the lack of posts. Honestly. I finally saved enough money and bought myself a new laptop. However, it's taking me a lot longer than anticipated to transfer everything I've had on my old laptop. Transferring from a PC to a Macbook isn't as hard as I thought it was going to be, but it's just tedious.
Anyways, don't worry. While I was saving up money and what not, I did multiple tutorials. I just have to post them up, but for the most part as soon as I edit the photos they're all ready to go.
I just wanted to give you guys a heads up on what's been going on. I'm not giving up on this blog. It's just a lot harder to maintain than I realize.
Thanks for being understanding. Hopefully I'll have a new post up shorty.
Stace.

Thursday, August 23, 2012

Monday, July 23, 2012
Inverted Pointed French Tip.
Hello Hello!
Sorry for the lag of posts. I know I suck at this. My computers still not working and instead I'm in the process of saving up for a Mac desktop and I'm hoping if nothing goes wrong, I'll have it by the latest September, but I'm shooting for next month.
Anyways, here's a quick and easy tutorial. I hope you like it
//MATERIALS USED//
- OPI "Natural Base Coat"
- Wet N Wild "Heatwave"
- Kiss Nail Art Pen in silver
STEP 1.
Apply a base coat. (I know I repeat this, but honestly you'd be surprised how many people skip this step)
STEP 2.
Apply a base color. I only applied one layer of Heatwave because it was so dark. I usually apply two to get it a solid color with no nail color showing.
WAIT FOR THIS TO DRY.
STEP 3.
Using the Kiss Nail Art Pen in silver, draw a diagonal line from the side of the nail to the center of your nail tip. Do the same to the opposite side of the nail.
STEP 4.
Fill in the small triangle with the silver.
STEP 5.
Repeat step 3 & 4 for every single nail.
WAIT FOR YOUR NAILS TO DRY.
STEP 6.
After your nails are all dry, put a clear coat on to dry.
There you go.
Hope this helps!
Stace.

Sorry for the lag of posts. I know I suck at this. My computers still not working and instead I'm in the process of saving up for a Mac desktop and I'm hoping if nothing goes wrong, I'll have it by the latest September, but I'm shooting for next month.
Anyways, here's a quick and easy tutorial. I hope you like it
//MATERIALS USED//
- OPI "Natural Base Coat"
- Wet N Wild "Heatwave"
- Kiss Nail Art Pen in silver
STEP 1.
Apply a base coat. (I know I repeat this, but honestly you'd be surprised how many people skip this step)
STEP 2.
Apply a base color. I only applied one layer of Heatwave because it was so dark. I usually apply two to get it a solid color with no nail color showing.
WAIT FOR THIS TO DRY.
STEP 3.
Using the Kiss Nail Art Pen in silver, draw a diagonal line from the side of the nail to the center of your nail tip. Do the same to the opposite side of the nail.
STEP 4.
Fill in the small triangle with the silver.
STEP 5.
Repeat step 3 & 4 for every single nail.
WAIT FOR YOUR NAILS TO DRY.
STEP 6.
After your nails are all dry, put a clear coat on to dry.
There you go.
Hope this helps!
Stace.

Wednesday, June 13, 2012
Acid Washed Nails.
Hello Hello!
I saw this tutorial and I thought it was cute. It took a while because you really do have to wait for each color to dry. You can do whatever colors you feel like doing. But for this "Acid Washed" design I went with the dark acid washed jeans look.
Hope you enjoy.
The materials I used (everything is written in the EXACT order I used):
-OPI "Natural Base Coat"
-China Glaze "First Mate"
-NYC "French White Tip"
-cotton swab drenched in nail polish remover
-OPI "Top Coat"
STEP ONE.
Apply a base coat. I get asked this a lot surprisingly. YES YOU NEED A BASE COAT. Using a base coat protects your nails from the polish and prevents it from staining. Wait for the base coat to dry.
*For this particular tutorial, I was liberal and uses 2 coats of my base coat*
STEP TWO.
Apply TWO coats of "First Mate". Wait in between each coat for it to dry.
WAIT COMPLETELY FOR THE COATS TO DRY BEFORE PROCEEDING ONTO THE NEXT STEP.
STEP THREE.
Apply ONE THIN coat of "French White Tip" over the entire nail.
WAIT COMPLETELY FOR THE COAT TO DRY BEFORE PROCEEDING ONTO THE NEXT STEP.
STEP FOUR.
Take a cotton swab dipped into nail polish remover and LIGHTLY remove the white coat. You're going for a distressed look. Lightly run in the area you want. Don't continuously rub the same area as you'll just remove the white and leave a line. It won't create the distressed look we're going for.
YOU CAN MAKE WHATEVER DESIGN YOU WANT.
STEP FIVE.
Repeat Step Four on every single nail.
STEP SIX.
Apply a top coat.
Hope this helps!
Stace

I saw this tutorial and I thought it was cute. It took a while because you really do have to wait for each color to dry. You can do whatever colors you feel like doing. But for this "Acid Washed" design I went with the dark acid washed jeans look.
Hope you enjoy.
The materials I used (everything is written in the EXACT order I used):
-OPI "Natural Base Coat"
-China Glaze "First Mate"
-NYC "French White Tip"
-cotton swab drenched in nail polish remover
-OPI "Top Coat"
STEP ONE.
Apply a base coat. I get asked this a lot surprisingly. YES YOU NEED A BASE COAT. Using a base coat protects your nails from the polish and prevents it from staining. Wait for the base coat to dry.
*For this particular tutorial, I was liberal and uses 2 coats of my base coat*
STEP TWO.
Apply TWO coats of "First Mate". Wait in between each coat for it to dry.
WAIT COMPLETELY FOR THE COATS TO DRY BEFORE PROCEEDING ONTO THE NEXT STEP.
STEP THREE.
Apply ONE THIN coat of "French White Tip" over the entire nail.
WAIT COMPLETELY FOR THE COAT TO DRY BEFORE PROCEEDING ONTO THE NEXT STEP.
STEP FOUR.
Take a cotton swab dipped into nail polish remover and LIGHTLY remove the white coat. You're going for a distressed look. Lightly run in the area you want. Don't continuously rub the same area as you'll just remove the white and leave a line. It won't create the distressed look we're going for.
YOU CAN MAKE WHATEVER DESIGN YOU WANT.
STEP FIVE.
Repeat Step Four on every single nail.
STEP SIX.
Apply a top coat.
Hope this helps!
Stace
Thursday, May 31, 2012
Simple Half Flower.
Hello Hello!
Sorry for not updating sooner, but things happen and my computers still not fixed sooo I'm using my phone to update you guys.
I did a quick "Simple Half Flower" and honestly it took all of 30 minutes including drying time. It's really easy and I hope you like it.
So here's all the materials I used:

 -Confetti "Last Dance"
-Nail Art CM in white
I used one coat of "Last Dance" instead of using my typical two since it gave really good coverage and it's pretty dark. As always, WAIT FOR IT TO COMPLETELY DRY. Next I used the CM to draw the lines.
Step 1. Draw a curved line at the bottom center
Step 2. Draw a curved line on the opposite side of the first line. It should look like a pointy oval
Step 3. Repeat Step 1 & 2 to the right of the original pointy oval
Step 4. Repeat Step 1 & 2 on the left of the original pointy oval


 That's it. I just did the design on my ring and thumb fingers.
It's really quick and easy.
That's it. I just did the design on my ring and thumb fingers.
It's really quick and easy.

Hope it helps!
Stace
Sorry for not updating sooner, but things happen and my computers still not fixed sooo I'm using my phone to update you guys.
I did a quick "Simple Half Flower" and honestly it took all of 30 minutes including drying time. It's really easy and I hope you like it.
So here's all the materials I used:

 -Confetti "Last Dance"
-Nail Art CM in white
I used one coat of "Last Dance" instead of using my typical two since it gave really good coverage and it's pretty dark. As always, WAIT FOR IT TO COMPLETELY DRY. Next I used the CM to draw the lines.
Step 1. Draw a curved line at the bottom center
Step 2. Draw a curved line on the opposite side of the first line. It should look like a pointy oval
Step 3. Repeat Step 1 & 2 to the right of the original pointy oval
Step 4. Repeat Step 1 & 2 on the left of the original pointy oval


Hope it helps!
Stace
Sunday, May 20, 2012
Update.
Hello Hello!
I know I know, I'm already falling behind on my promise of keeping this blog updated at least once a week. For that I'm sorry!
At the moment my computers not working -_- I dropped my computer and the screen won't show up. So I'm waiting for the repairs to be done. Hopefully it'll be soon.
I'll try to post up new tutorials soon, but it might be a little hard. No one else in the family has photoshop for me to use to watermark my pictures. I'll figure it out soon though.
One more final Tuesday and I'll have more time to post on here!
Thanks for your understanding.
Stace
I know I know, I'm already falling behind on my promise of keeping this blog updated at least once a week. For that I'm sorry!
At the moment my computers not working -_- I dropped my computer and the screen won't show up. So I'm waiting for the repairs to be done. Hopefully it'll be soon.
I'll try to post up new tutorials soon, but it might be a little hard. No one else in the family has photoshop for me to use to watermark my pictures. I'll figure it out soon though.
One more final Tuesday and I'll have more time to post on here!
Thanks for your understanding.
Stace
Saturday, May 12, 2012
Kiss Complete Salon Acrylic Kit Review
Hello Hello!
*Quick Update: I purchased this kit at Walgreens for $19.99, but I found the same product at Rite Aid for $17.99.*
So honestly I never thought I'd be sitting here writing a review on any product. I guess I've never thought about it because I haven't tried any product where I felt like "damn I have to let people know about it."
BUT I have found something that I absolutely love and I just have to tell you guys about. I used to do my own acrylic nails, but then I got lazy and I hated how much the acrylic liquid smelled. It used to stink up my whole house even with ALL the windows opened.
 This is the product that I bought. "Kiss Complete Salon Acrylic Kit". I bought it at Walgreens for $19.99. It's a little pricy I know, but completely worth it. I've tried multiple at home kits from Sally's Beauty and they all suck and smell.
In Kiss' set it includes the following:
- 24 white tips
- 40 natural nail tips
- 20 sculpture nail forms
- apple fresh acrylic liquid masking formula (2g)
- acrylic liquid (14g)
- acrylic powder (9g)
- acrylic powder (9g)
- acrylic primer (9g)
- nail glue (3g)
- dappen dish
- 6" 2-way nail file
- beveled manicure stick
- professional acrylic brush
It actually includes a lot for just $19.99 in my opinion. I really like their white tips because they're shorter than the typical nail tips like at the salon so it's a little easier to cut and what not. The sizes were a little bigger for me simply because my nail beds are smaller than normal. So I had to file the sides down a little bit.
But I think the best part was the apple fresh acrylic liquid masking formula. I was afraid that the acrylic liquid was going to make my house smell like the other at home kits I've used. I followed their instructions and put the masking formula in and it honestly smelled like apples. Kind of like an apple gum. It wasn't that bad. You couldn't smell the acrylic liquid at all. COMPLETE BONUS! This is the first kit (trust me when I say first, I've tried a lot) that comes with a masking formula.
The kit also comes with a step by step directions on how to apply the acrylic to your nails. It's a little difficult at first. I remember the difficulty I had the first time I did my own. The directions in this kit however, made it so easy to do. If you're a first timer I think you should have no problems what so ever.
Now in almost every single kit I've ever bought, the brush ALWAYS SUCKS! The bristles always come undone and literally by the end of just one use I have to throw the brush away. The brush in this kit is pretty durable and works perfectly. I simply love it.
Seriously this is going to be my new go to kit whenever I need to do my own acrylics. Completely worth the money.

This was my end result(: I'm completely happy with how they turned out.
Hope this helps!
Stace.
*Quick Update: I purchased this kit at Walgreens for $19.99, but I found the same product at Rite Aid for $17.99.*
So honestly I never thought I'd be sitting here writing a review on any product. I guess I've never thought about it because I haven't tried any product where I felt like "damn I have to let people know about it."
BUT I have found something that I absolutely love and I just have to tell you guys about. I used to do my own acrylic nails, but then I got lazy and I hated how much the acrylic liquid smelled. It used to stink up my whole house even with ALL the windows opened.
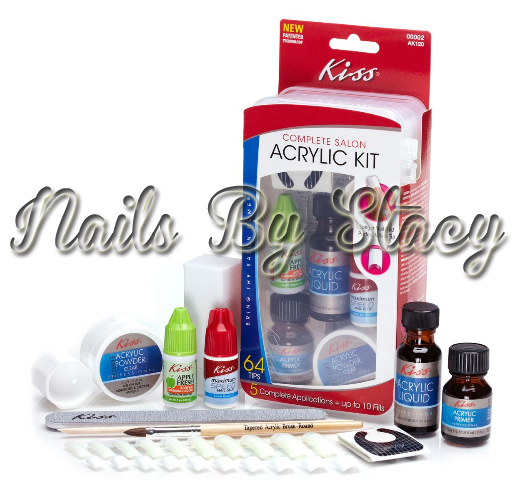 This is the product that I bought. "Kiss Complete Salon Acrylic Kit". I bought it at Walgreens for $19.99. It's a little pricy I know, but completely worth it. I've tried multiple at home kits from Sally's Beauty and they all suck and smell.
In Kiss' set it includes the following:
- 24 white tips
- 40 natural nail tips
- 20 sculpture nail forms
- apple fresh acrylic liquid masking formula (2g)
- acrylic liquid (14g)
- acrylic powder (9g)
- acrylic powder (9g)
- acrylic primer (9g)
- nail glue (3g)
- dappen dish
- 6" 2-way nail file
- beveled manicure stick
- professional acrylic brush
It actually includes a lot for just $19.99 in my opinion. I really like their white tips because they're shorter than the typical nail tips like at the salon so it's a little easier to cut and what not. The sizes were a little bigger for me simply because my nail beds are smaller than normal. So I had to file the sides down a little bit.
But I think the best part was the apple fresh acrylic liquid masking formula. I was afraid that the acrylic liquid was going to make my house smell like the other at home kits I've used. I followed their instructions and put the masking formula in and it honestly smelled like apples. Kind of like an apple gum. It wasn't that bad. You couldn't smell the acrylic liquid at all. COMPLETE BONUS! This is the first kit (trust me when I say first, I've tried a lot) that comes with a masking formula.
The kit also comes with a step by step directions on how to apply the acrylic to your nails. It's a little difficult at first. I remember the difficulty I had the first time I did my own. The directions in this kit however, made it so easy to do. If you're a first timer I think you should have no problems what so ever.
Now in almost every single kit I've ever bought, the brush ALWAYS SUCKS! The bristles always come undone and literally by the end of just one use I have to throw the brush away. The brush in this kit is pretty durable and works perfectly. I simply love it.
Seriously this is going to be my new go to kit whenever I need to do my own acrylics. Completely worth the money.

This was my end result(: I'm completely happy with how they turned out.
Hope this helps!
Stace.
Thursday, May 10, 2012
Ninja Nails.
Hello Hello!
Here's another simple easy tutorial. This time it's a Ninja Themed Tutorial! I hope you guys like it. It seriously took all of 30 minutes to do them. It's by far the easiest thing I've done and it's cute. (Well I think so).

 STEP TWO
Paint ONE coat of NYX Girls "Milano". I thought it was a pretty neutral base coat with a shine in it. It's kind of a glittery gold. I used this as my base. Wait for this coat to dry before proceeding onto the next step.

STEP THREE
 Take the Kiss Nail Art Paint "05" and draw two lines horizontally somewhat close to each other. It doesn't matter how close or how far the lines are. The only part that matters is the center. It needs to be neat and tidy. Everywhere else doesn't matter. You'll be painting it. Wait for this coat to dry before proceeding onto the next step.
STEP FOUR
 Paint the top half of the line with the Kiss Nail Art Paint "05". Repeat the step for the bottom half of the second line.
STEP FIVE
Take the toothpick and dip it into some Wet N' Wild "Black Cream". Put two dots in the center (where the "Milano" is) You're creating the eyes with the toothpick. This is what the finished product will look like.
STEP SIX
Use whatever top coat you want to cover the design so it doesn't chip.
As you can tell I'm a little bit messy with my nail polish. I don't really care if it gets on my skin/cuticle while I'm painting my nails. It's easily fixable.
This is what I do to erase any nail polish on my cuticle.
1. Grab a clean Q-Tip.
2. Pluck one end of the Q-Tip, to the point where there's hardly any cotton on it.
3. Dip it into nail polish remover, turn the Q-Tip around between your fingers to wrap the cotton around the stick and to remove excess remover.
4. Move the Q-Tip SLOWLY to remove the nail polish.
That's all I do.
Hope this helps!
Stace.
Here's another simple easy tutorial. This time it's a Ninja Themed Tutorial! I hope you guys like it. It seriously took all of 30 minutes to do them. It's by far the easiest thing I've done and it's cute. (Well I think so).

Here's all the materials I used.
- OPI "Natural Nail Base Coat"
- NYX Girls "Milano"
- Wet N' Wild "Black Cream"
- Kiss Nail Art Paint "05"
- Toothpick"
STEP ONE
As always START OFF with a base coat. Again not doing so and painting your nail with colored polish WILL STAIN your nails. Wait for this coat to dry.
 STEP TWO
Paint ONE coat of NYX Girls "Milano". I thought it was a pretty neutral base coat with a shine in it. It's kind of a glittery gold. I used this as my base. Wait for this coat to dry before proceeding onto the next step.

STEP THREE
 Take the Kiss Nail Art Paint "05" and draw two lines horizontally somewhat close to each other. It doesn't matter how close or how far the lines are. The only part that matters is the center. It needs to be neat and tidy. Everywhere else doesn't matter. You'll be painting it. Wait for this coat to dry before proceeding onto the next step.
STEP FOUR
 Paint the top half of the line with the Kiss Nail Art Paint "05". Repeat the step for the bottom half of the second line.
 STEP FIVE
Take the toothpick and dip it into some Wet N' Wild "Black Cream". Put two dots in the center (where the "Milano" is) You're creating the eyes with the toothpick. This is what the finished product will look like.
STEP SIX
Use whatever top coat you want to cover the design so it doesn't chip.
As you can tell I'm a little bit messy with my nail polish. I don't really care if it gets on my skin/cuticle while I'm painting my nails. It's easily fixable.
This is what I do to erase any nail polish on my cuticle.
1. Grab a clean Q-Tip.
2. Pluck one end of the Q-Tip, to the point where there's hardly any cotton on it.
3. Dip it into nail polish remover, turn the Q-Tip around between your fingers to wrap the cotton around the stick and to remove excess remover.
4. Move the Q-Tip SLOWLY to remove the nail polish.
That's all I do.
Hope this helps!
Stace.
Subscribe to:
Posts (Atom)